 This is the first post of a three-part series about filesystems, containers, and Concourse. The goal of this series is to describe what the different volume drivers available in Concourse do.
At Techorrect, we’re huge fans of Concourse. At its core, it offers a few simple primitives (resources and tasks) which you can then combine and extend to accomplish work with various levels of complexity. As you begin using Concourse more, you may encounter a few issues relating to volumes and disk space, and many times, the suggested fix is to switch from the btrfs storage driver to the overlay storage driver. I wanted to learn what was going on behind the scenes, and this series is a summary of my notes during this investigation.
While filesystems are huge topic in itself and is not simple, this post will only briefly describe the btrfs and overlayfs filesystems in Linux1. These two filesystems contain features that can be leveraged by container managers like Docker to allow containers to all point to the same underlying image instead of copying the image each time a new container is created. Docker has a good explanation of how it manages image layers with btrfs and overlayfs at https://docs.docker.com/storage/storagedriver (select the relevant filesystem in the menu on the left), and this is also the topic of the next blog post in this series.
btrfs
btrfs is a “real” filesystem operating on a block device, based on the copy-on-write (CoW) idea. btrfs provides a “subvolumes” feature - when you create a new btrfs subvolume, it is still part of the parent btrfs filesystem, but can be conceptualized as an independent area. You can access btrfs subvolumes just like a regular directory, or you can also mount it like a new filesystem (which hides the original parent btrfs filesystem). Additionally, you can take “snapshots” of subvolumes - snapshots are also subvolumes just with some initial content. Because of btrfs’s CoW capabilities, taking snapshots is an easy and efficient thing to do. Another feature that makes btrfs well-suited to container managers is its ability to nest subvolumes within subvolumes, which we’ll come back to in a future post in this series. Let’s play around with btrfs on an actual system that supports it - I’ve run the following commands on an AWS EC2 Ubuntu 18.04 instance with an extra EBS volume (/dev/xvdb) attached. You can also find the scripts at https://github.com/edtan/filesystems-experiment.
First, let’s make sure that the kernel supports btrfs:
cat /proc/filesystems | grep btrfs
    btrfs
We then create a btrfs filesystem on the extra EBS volume that we attached to the ECS instance. This needs to be done because btrfs is a filesystem dealing with actual block devices.
sudo mkfs.btrfs -f /dev/xvdb
Mount the volume at /scratch, and assign the current user the owner of the mount directory:
sudo mkdir /scratch
sudo mount -t btrfs /dev/xvdb /scratch
sudo chown -R $USER:$USER /scratch
Begin by creating a btrfs subvolume:
btrfs subvolume create /scratch/subvolume1
Then create a large file - I just wrote a bunch of yes’s to a file and manually hit Ctrl+C after a few seconds, which resulted in a 352MB file.
yes > /scratch/subvolume1/yes.txt
You can now pass the --reflink option to cp which performs a CoW copy. This would error if you try doing this on a filesystem that doesn’t support CoW.
cp --reflink /scratch/subvolume1/yes.txt /scratch/subvolume1/yes-copy.txt
Now, we need to keep in mind the distinction between space used at the block layer (e.g. the underlying space used) and at the file layer. To some regular tools, it looks like there are two 352MB files, as it reports on files:
ls -l --human-readable /scratch/subvolume1/
total 703M
-rw-rw-r-- 1 ubuntu ubuntu 352M Aug 20 18:29 yes-copy.txt
-rw-rw-r-- 1 ubuntu ubuntu 352M Aug 20 18:29 yes.txt
But the underlying space used is 352MB, not 704MB. We can check this using btrfs tools.
In the next command, FS bytes shows the underlying space used. Also notice the 1.08GB used: btrfs allocates data in 1GB chunks:
sudo btrfs filesystem show /dev/xvdb
Label: none  uuid: 69e7407a-7bf2-4179-ac0e-ce342f091f54
	Total devices 1 FS bytes used 351.74MiB
	devid    1 size 8.00GiB used 1.08GiB path /dev/xvdb
It’s also interesting to see the output of a few other btrfs commands and regular commands:
# check the disk space usage.  "Set shared" is the all the space shared by
# all children of the argument to du (in this case, /scratch).  Notice
# that the "set shared" is only the size of the original yes.txt
btrfs filesystem du /scratch
     Total   Exclusive  Set shared  Filename
 351.74MiB       0.00B           -  /scratch/subvolume1/yes.txt
 351.74MiB       0.00B           -  /scratch/subvolume1/yes-copy.txt
 703.48MiB       0.00B           -  /scratch/subvolume1
 703.48MiB       0.00B   351.74MiB  /scratch

# check filesystem stats, may need to wait a while before running this
# command to have up to date stats
btrfs filesystem df /scratch
Data, single: total=840.00MiB, used=351.99MiB
System, single: total=4.00MiB, used=16.00KiB
Metadata, single: total=264.00MiB, used=512.00KiB
GlobalReserve, single: total=16.00MiB, used=0.00B

# Notice that we get slightly differently stats from the df and du
# commands
df --human /scratch/
Filesystem      Size  Used Avail Use% Mounted on
/dev/xvdb       8.0G  369M  7.4G   5% /scratch

du --human --summarize /scratch/
704M	/scratch/
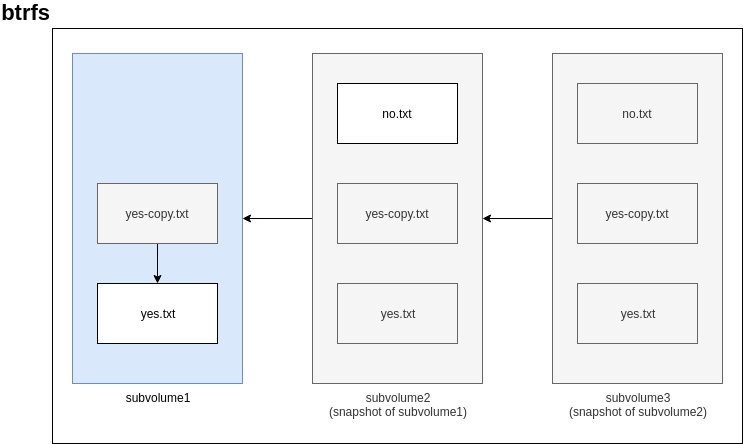
Now, let’s try creating a snapshot of subvolume1:
btrfs subvolume snapshot /scratch/subvolume1/ /scratch/subvolume2
We can see that the snapshot (subvolume2) starts off with the contents from subvolume1:
ls /scratch/subvolume2
yes-copy.txt  yes.txt
Next, we create a new file in the new snapshot, filing up a file with a bunch of no’s. Again, Ctrl+C after a second produces a sufficiently large file for testing:
yes no > /scratch/subvolume2/no.txt
Checking the disk space usage again, we see that the “set shared” is still the same
because we’ve taken a snapshot of the original subvolume. The only data that is still shared
is the original yes.txt. Additionally, we see that the new no.txt in the snapshot
has a non-zero “exclusive” size, meaning that its data is not shared with any other files:
btrfs filesystem du /scratch
     Total   Exclusive  Set shared  Filename
 351.74MiB       0.00B           -  /scratch/subvolume1/yes.txt
 351.74MiB       0.00B           -  /scratch/subvolume1/yes-copy.txt
 703.48MiB       0.00B           -  /scratch/subvolume1
 351.74MiB       0.00B           -  /scratch/subvolume2/yes.txt
 351.74MiB       0.00B           -  /scratch/subvolume2/yes-copy.txt
 157.06MiB   157.06MiB           -  /scratch/subvolume2/no.txt
 860.54MiB   157.06MiB           -  /scratch/subvolume2
   1.53GiB   157.06MiB   351.74MiB  /scratch
Let’s try creating a new snapshot called subvolume3 of the existing snapshot (subvolume2):
btrfs subvolume snapshot /scratch/subvolume2/ /scratch/subvolume3
No surprise here, it starts off with the contents of subvolume2:
ls /scratch/subvolume3
no.txt  yes-copy.txt  yes.txt
Finally, we run various commands to examine “space used”:
btrfs filesystem du /scratch
     Total   Exclusive  Set shared  Filename
 351.74MiB       0.00B           -  /scratch/subvolume1/yes.txt
 351.74MiB       0.00B           -  /scratch/subvolume1/yes-copy.txt
 703.48MiB       0.00B           -  /scratch/subvolume1
 351.74MiB       0.00B           -  /scratch/subvolume2/yes.txt
 351.74MiB       0.00B           -  /scratch/subvolume2/yes-copy.txt
 157.06MiB       0.00B           -  /scratch/subvolume2/no.txt
 860.54MiB       0.00B           -  /scratch/subvolume2
 351.74MiB       0.00B           -  /scratch/subvolume3/yes.txt
 351.74MiB       0.00B           -  /scratch/subvolume3/yes-copy.txt
 157.06MiB       0.00B           -  /scratch/subvolume3/no.txt
 860.54MiB       0.00B           -  /scratch/subvolume3
   2.37GiB       0.00B   508.80MiB  /scratch

btrfs filesystem df /scratch
Data, single: total=840.00MiB, used=509.06MiB
System, single: total=4.00MiB, used=16.00KiB
Metadata, single: total=264.00MiB, used=704.00KiB
GlobalReserve, single: total=16.00MiB, used=0.00B

df --human /scratch/
Filesystem      Size  Used Avail Use% Mounted on
/dev/xvdb       8.0G  526M  7.3G   7% /scratch

du --human --summarize /scratch/
2.4G	/scratch/
As the example shows, different tools return different stats on how much space is being used depending on whether we’re looking at the block or file layer. For a better, detailed explaination, see this link.
Finally, here’s a diagram summarizing our actions:
overlayfs
Whereas btrfs is an actual filesystem dealing with block devices, overlayfs is a union filesystem that exists on top of an existing filesystem. A union mount lets you view a set of directories as a single, consolidated directory. In overlayfs, you provide a lower directory and a upper directory, and overlayfs provides a view of these two directories “overlayed” together - this view is accessible as just another directory. In this overlay directory, if a name exists in both the lower and upper directories, the object in the upper directory “wins” and shows up while the object in the lower directory is hidden. Any writes to the overlay directory go to the upper directory behind the scenes.
You can also have multiple lower directories where the directories are “stacked” on top of each other, and directories higher up the stack hide objects of the same name lower down the stack. Additionally, a lower directory can also be another overlayfs directory, but keep in mind that this is different than trying to create another overlayfs from lower and upper directories nested within the overlay directory (we’ll come back to this in a future post). All this is probably better explained with an example.
Create a working directory, and lower, upper, workdir, and overlay directories. workdir is used internally by overlayfs:
# Create a working directory, and create the lower, upper, workdir, and
# overlay directories in it in preparation for an overlayfs mount
mkdir -p overlay-test/{lower,upper,workdir,overlay}
mkdir -p overlay-test/lower/samedir
mkdir -p overlay-test/upper/samedir
cd overlay-test
Now create files in the lower and upper directories for three cases:
- a file only in the
lowerdirectory (lower.txt) - a file only in the
upperdirectory (upper.txt) - a file in both the
lowerandupperdirectories (same.txt)
Additionally, create the same three cases within subdirectories of the lower and upper
directories to show what happens when directories are “merged” together in overlayfs:
echo "This is lower.txt in the lower dir" | tee lower/lower.txt lower/samedir/lower.txt
echo "This is upper.txt in the upper dir" | tee upper/upper.txt upper/samedir/upper.txt
echo "This is same.txt in the lower dir" | tee lower/same.txt lower/samedir/same.txt
echo "This is same.txt in the upper dir" | tee upper/same.txt upper/samedir/same.txt
This is what the directories look like after we have finished the preparation:
tree
.
├── lower
│   ├── lower.txt
│   ├── samedir
│   │   ├── lower.txt
│   │   └── same.txt
│   └── same.txt
├── overlay
├── upper
│   ├── samedir
│   │   ├── same.txt
│   │   └── upper.txt
│   ├── same.txt
│   └── upper.txt
└── workdir
Now we mount overlayfs on the overlay directory. Notice that we don’t have to issue
a “mkfs” command like we did for btrfs, because this isn’t a “real” filesystem dealing with
block devices. We’re just using directories on the existing filesystem (I’m running this example
on ext4 from my own machine):
sudo mount -t overlay overlay -o lowerdir=lower,upperdir=upper,workdir=workdir overlay
Let’s examine the directories now. Notice that the overlay directory is now a combined view of the lower
and upper directories!
tree
.
├── lower
│   ├── lower.txt
│   ├── samedir
│   │   ├── lower.txt
│   │   └── same.txt
│   └── same.txt
├── overlay
│   ├── lower.txt
│   ├── samedir
│   │   ├── lower.txt
│   │   ├── same.txt
│   │   └── upper.txt
│   ├── same.txt
│   └── upper.txt
├── upper
│   ├── samedir
│   │   ├── same.txt
│   │   └── upper.txt
│   ├── same.txt
│   └── upper.txt
└── workdir
    └── work [error opening dir]
same.txt from the upper directory “wins”, and is the one visible in the overlay directory:
cat overlay/same.txt
This is same.txt in the upper dir
Now let’s modify same.txt in the overlay directory, and see what happens
to the underlying files in the lower and upper directories:
echo "Modifying the same.txt" > overlay/same.txt
The same.txt in the upper directory was modified:
cat upper/same.txt
Modifying the same.txt
But same.txt in the lower directory was left intact:
cat lower/same.txt
This is same.txt in the lower dir
Now let’s try modifying same.txt in the upper directory and
see what happens in the overlay directory:
echo "Modifying the same.txt in upper dir directly" > upper/same.txt
Success! In the overlay directory, we can now see the changes that were made directly in the upper directory:
cat overlay/same.txt
Modifying the same.txt in upper dir directly
The next example shows how we can create another overlayfs mount using
an existing overlayfs mount as a lower directory. We create a new set of directories
except for the lower directory, which we’ll reuse from the previous example.
mkdir -p {upper2,workdir2,overlay2}

ls
lower  overlay  overlay2  upper  upper2  workdir  workdir2
For good measure, let’s create a new file in the new upper2 directory:
echo "This is upper2.txt in the upper2 dir" > upper2/upper2.txt
Create the second overlayfs mount on overlay2, using the previous overlay directory as the lower directory.
sudo mount -t overlay overlay -o lowerdir=overlay,upperdir=upper2,workdir=workdir2 overlay2
Notice how overlay2 looks like the previous overlay directory combined with the new upper2 directory:
tree
.
├── lower
│   ├── lower.txt
│   ├── samedir
│   │   ├── lower.txt
│   │   └── same.txt
│   └── same.txt
├── overlay
│   ├── lower.txt
│   ├── samedir
│   │   ├── lower.txt
│   │   ├── same.txt
│   │   └── upper.txt
│   ├── same.txt
│   └── upper.txt
├── overlay2
│   ├── lower.txt
│   ├── samedir
│   │   ├── lower.txt
│   │   ├── same.txt
│   │   └── upper.txt
│   ├── same.txt
│   ├── upper2.txt
│   └── upper.txt
├── upper
│   ├── samedir
│   │   ├── same.txt
│   │   └── upper.txt
│   ├── same.txt
│   └── upper.txt
├── upper2
│   └── upper2.txt
├── workdir
│   └── work [error opening dir]
└── workdir2
    └── work [error opening dir]
However, trying to “nest” an independent overlayfs completely within an existing overlay directory is not possible.
To illustrate this, we first create a new, independent set of lower, upper, workdir, and overlay
directories completely within the existing overlay directory:
cd overlay
mkdir -p {innerlower,innerupper,innerworkdir,inneroverlay}

tree
.
├── innerlower
├── inneroverlay
├── innerupper
├── innerworkdir
├── lower.txt
├── samedir
│   ├── lower.txt
│   ├── same.txt
│   └── upper.txt
├── same.txt
└── upper.txt
This doesn’t work:
sudo mount -t overlay overlay -o lowerdir=inneroverlay,upperdir=innerupper,workdir=innerworkdir inneroverlay

mount: wrong fs type, bad option, bad superblock on overlay,
       missing codepage or helper program, or other error

       In some cases useful info is found in syslog - try
       dmesg | tail or so.
Finally, let’s take a look at file sizes to contrast this with
btrfs.
df --human
# I've filtered out the output to show only the lines of interest
Filesystem      Size  Used Avail Use% Mounted on
/dev/sda6       111G  104G  916M 100% /
overlay         111G  104G  916M 100% /home/user/overlay-test/overlay
overlay         111G  104G  916M 100% /home/user/overlay-test/overlay2

cd ..
sudo du --human --summarize *
24K	lower
48K	overlay
52K	overlay2
40K	upper
4.0K	upper2
8.0K	workdir
8.0K	workdir2
Let’s generate a large file in lower and see what the file sizes
look like then. Again, Ctrl+C after a few seconds results in a large (323MB) file:
yes > lower/yes.txt
Examining file sizes:
df --human
# I've filtered out the output to show only the lines of interest
Filesystem      Size  Used Avail Use% Mounted on
/dev/sda6       111G  105G  594M 100% /
overlay         111G  105G  594M 100% /home/user/overlay-test/overlay
overlay         111G  105G  594M 100% /home/user/overlay-test/overlay2

sudo du --human --summarize *
323M	lower
375M	overlay
375M	overlay2
40K	upper
4.0K	upper2
8.0K	workdir
8.0K	workdir2
From df, we see that /dev/sda6’s available space has decreased by 322MB, the size of the last file
we created in the lower directory. However, df also shows the same results for the other two overlayfs
mounts we created.
This suggest that overlay and overlay2 are pointing to the yes.txt in lower instead of being copies.
Finally, clean up our work directory:
sudo umount overlay2
sudo umount overlay
cd ..
rm -rf overlay-test
In part 2 of this series, we’ll explain how container managers use these file systems to efficiently reuse images.
-
I use
overlayfsto refer to the Linux filesystem driver, andoverlayto refer to Concourse’s storage driver that usesoverlayfsto manage its containers. While this post focuses onoverlayfsonly, the distinction will become important for the next posts in this series. ↩
Comments (0 responses)